"Ultimate Tower Blitz: Eternal Tier List Update"
Embarking on your *Tower Blitz* journey starts with just one tower, but as you progress, you'll unlock a diverse array of towers, each with unique strengths and weaknesses. To help you tailor your strategy to your play style, we present a comprehensive tier list of all the towers available in *Tower Blitz*.
All Towers In Tower Blitz Ranked
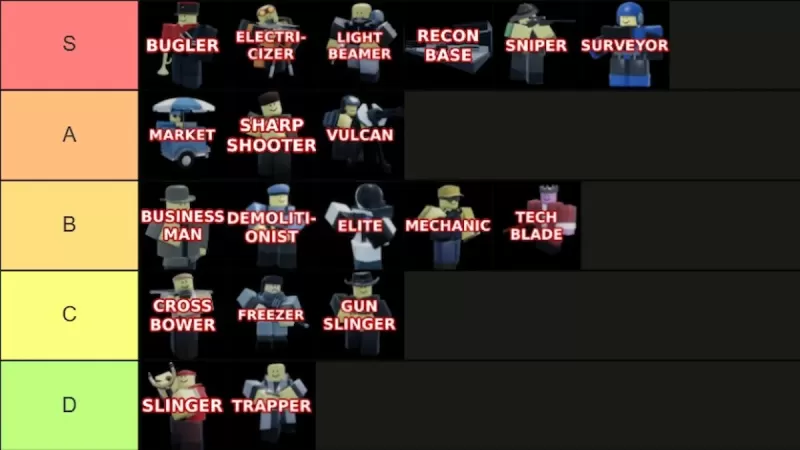 Image by The Escapist.
We've meticulously categorized all the towers from S-Tier to D-Tier, taking into account their abilities, upgrade paths, cost, and overall efficiency. **S-Tier** towers are the cream of the crop, virtually ensuring victory on any map when used effectively. **A-Tier** towers are solid performers with minor drawbacks that set them apart from the top tier. **B-Tier** towers are middle-of-the-road, offering decent performance but lacking the edge of higher tiers. **C-Tier** towers have significant flaws, though they may still be useful in specific scenarios. **D-Tier** towers are the least effective and should generally be avoided. Below, you'll find detailed explanations of our rankings.
S-Tier Towers
| Tower | Cost | Explanation | Pros and Cons |
|---|---|---|---|
 | To unlock the tower: **2500 Tokens** (available at Level 25) To place in-game: **750 Cash** | The Bugler is a powerhouse support tower that's almost essential for Expert mode. Its versatility in boosting other towers' performance is unmatched, though it can't buff Recon Bases. | + Dramatically enhances other towers' performance + Essential for Expert mode – Exclusively a support tower |
 | To unlock the tower: **5500 Tokens** To place in-game: **3800 Cash** | For those who crave the power of a Sniper but need something more potent, the Electricizer delivers with its unmatched range and damage. Position it strategically at the end of the map to obliterate incoming foes. | + Exceptional range and damage + Versatile in both support and damage roles – High cost |
 | To unlock the tower: **Complete the contract** To place in-game: **1800 Cash** | The Lightbeamer stands as one of the game's strongest towers. Place it along a straight path to maximize its devastating death ray. Both upgrade paths are formidable, making it a game-changer with the right placement. | + Extremely powerful + Excellent for crowd control – Not viable early in the game – Costly |
 | To unlock the tower: **8000 Tokens** (available at Level 45) To place in-game: **1000 Cash** | The Recon Base is a game-changer, spawning operatives that fight alongside you. Both upgrade paths are powerful, making it crucial for success on Expert difficulty despite its steep upgrade costs. | + Continuously spawns units + Both paths are exceptionally strong + Ideal for Expert mode – Expensive upgrades |
 | To unlock the tower: **1500 Tokens** To place in-game: **500 Cash** | The Sniper is your go-to early-game tower, excelling in both early and late stages, especially on Expert. Its high piercing damage makes it a must-have, though it might seem slow at first. | + Best early-game tower + Usable throughout the game + High piercing damage – Slightly slow |
 | To unlock the tower: **Complete the contract** To place in-game: **700 Cash** | The Surveyor is incredibly versatile, capable of functioning as both a support and damage tower depending on the upgrade path you choose. Its utility spans the entire game, making it a valuable asset. | + Highly versatile + Usable from start to finish – Limited to four placements |
A-Tier Towers
| Tower | Cost | Explanation | Pros and Cons |
|---|---|---|---|
 | To unlock the tower: **1000 Tokens** To place in-game: **650 Cash** | The Market is a valuable asset for generating income, particularly in multiplayer. Focus on the top path for optimal cash generation, as the bottom path can be misleading and unprofitable. | + Essential for all games, especially multiplayer + Profitable – Bottom path not as effective – Slow initial income |
 | To unlock the tower: **1300 Tokens** To place in-game: **600 Cash** | The Sharpshooter excels in early-game scenarios, effectively managing groups of enemies. Its range is sufficient for early stages, though its piercing damage could be better. Ideal for beginners, but less effective on Expert. | + Excellent for crowd control and damage + Great for beginners – Less effective on Expert – Low defense piercing |
 | To unlock the tower: **3000 Tokens** To place in-game: **2500 Cash** | The Vulcan is a solid choice for mid to late-game, offering flexibility in targeting multiple enemies or focusing on single-target damage. The bottom path maximizes its potential, reaching 140 DPS and full defense pierce at max level. | + Highly effective + Versatile – Slow to reach full strength – Lacks flying detection |
B-Tier Towers
| Tower | Cost | Explanation | Pros and Cons |
|---|---|---|---|
 | To unlock the tower: **Complete the contract** To place in-game: **800 Cash** | The Businessman can generate income and deal damage, making it a versatile early-game choice. It pairs well with Recon Base but is outshined by the Market for money and other towers for damage. | + Generates money and deals damage + Suitable for early game – Easily replaced by better options |
 | To unlock the tower: **3500 Tokens** To place in-game: **900 Cash** | The Demolitionist is effective early on, managing groups with high piercing damage. However, it quickly becomes obsolete as the game progresses, and it lacks flying detection. | + Effective crowd control and piercing damage – Not useful beyond early-game – No flying detection |
 | To unlock the tower: **Complete the contract** To place in-game: **1200 Cash** | Similar to the Vulcan, the Elite offers less versatility. Opt for the bottom path to maximize its potential, but be aware of its long cooldown, which can impact its effectiveness. | + Strong bottom path – Lengthy cooldown – Expensive |
 | To unlock the tower: **Complete the contract** To place in-game: **480 Cash** | The Mechanic is useful in mid-game with its array of turrets, but its cost-efficiency is questionable. Only the Tesla turrets make a significant impact, and that's limited to certain enemies. | + Useful in mid-game – Cost-inefficient |
 | To unlock the tower: **Free** (available at Level 10) To place in-game: **400 Cash** | The Techblade is a melee tower effective against groups and tanks in early-game. Its limited range and slow speed, however, hinder its overall utility. | + Effective crowd control + Efficient in early-game – Limited range – Slow |
C-Tier Towers
| Tower | Cost | Explanation | Pros and Cons |
|---|---|---|---|
 | To unlock the tower: **200 Tokens** To place in-game: **400 Cash** | The Crossbower is a decent choice for beginners or as an early-game alternative to the Slinger. Its long range is a plus, but its low damage output limits its usefulness. | + Affordable, suitable for beginners + Long range – Becomes obsolete after early-game – Low damage |
 | To unlock the tower: **450 Tokens** To place in-game: **400 Cash** | The Freezer can be beneficial when paired with high-DPS towers, especially against fast enemies. However, it becomes less effective once enemies gain freeze immunity, and better tower combinations are available. | + Effective against fast enemies – Becomes obsolete post-early-game – Limited to certain enemies |
 | To unlock the tower: **500 Tokens** To place in-game: **400 Cash** | The Gunslinger, another melee tower, suffers from a lack of speed and range. The top path improves range but at the expense of damage, making it suitable only for Normal difficulty. | + Improved top path – Limited range – Ineffective on Hard or Expert |
D-Tier Towers
| Tower | Cost | Explanation | Pros and Cons |
|---|---|---|---|
 | To unlock the tower: **Free** To place in-game: **200 Cash** | The Slinger is a starter tower meant to introduce new players to the game. It's best used in the first wave and replaced as soon as possible due to its poor performance. | + Free – Poor damage and firing speed, even at max level – Obsolete after early waves |
 | To unlock the tower: **1000 Tokens** (available at Level 10) To place in-game: **500 Cash** | The Trapper's high unlock cost and level requirement belie its inability to effectively combat even weak enemies. It's generally outclassed by cheaper, more effective towers. | + Decent bottom path – Not cost-efficient – Often ineffective – Struggles throughout the game |
With this detailed tier list of all the towers in *Tower Blitz*, you're now equipped to devise the best strategy for your play style. For an extra boost, don't forget to use our *Tower Blitz* codes to give yourself a head start in the game.
Latest Articles
Trending Games

![Taffy Tales [v1.07.3a]](https://imgs.anofc.com/uploads/32/1719554710667e529623764.jpg)


Top News

Latest Games